Recent reading

Cool articles ! You must read them.

Sunday, February 26, 2006

URL Rewriting in ASP.NET

Scott Mitchell

4GuysFromRolla.com


March 2004


Applies to:

Microsoft® ASP.NET


Summary: Examines how to perform dynamic URL rewriting with Microsoft ASP.NET. URL rewriting is the process of intercepting an incoming Web request and automatically redirecting it to a different URL. Discusses the various techniques for implementing URL rewriting, and examines real-world scenarios of URL rewriting. (31 printed pages)


Download the source code for this article.


Contents


Introduction

Common Uses of URL Rewriting

What Happens When a Request Reaches IIS

Implementing URL Rewriting

Building a URL Rewriting Engine

Performing Simple URL Rewriting with the URL Rewriting Engine

Creating Truly "Hackable" URLs

Conclusion

Related Books


Introduction


Take a moment to look at some of the URLs on your website. Do you find URLs like http://yoursite.com/info/dispEmployeeInfo.aspx?EmpID=459-099&type=summary? Or maybe you have a bunch of Web pages that were moved from one directory or website to another, resulting in broken links for visitors who have bookmarked the old URLs. In this article we'll look at using URL rewriting to shorten those ugly URLs to meaningful, memorable ones, by replacing http://yoursite.com/info/dispEmployeeInfo.aspx?EmpID=459-099&type=summary with something like http://yoursite.com/people/sales/chuck.smith. We'll also see how URL rewriting can be used to create an intelligent 404 error.


URL rewriting is the process of intercepting an incoming Web request and redirecting the request to a different resource. When performing URL rewriting, typically the URL being requested is checked and, based on its value, the request is redirected to a different URL. For example, in the case where a website restructuring caused all of the Web pages in the /people/ directory to be moved to a /info/employees/ directory, you would want to use URL rewriting to check if a Web request was intended for a file in the /people/ directory. If the request was for a file in the /people/ directory, you'd want to automatically redirect the request to the same file, but in the /info/employees/ directory instead.


With classic ASP, the only way to utilize URL rewriting was to write an ISAPI filter or to buy a third-party product that offered URL rewriting capabilities. With Microsoft® ASP.NET, however, you can easily create your own URL rewriting software in a number of ways. In this article we'll examine the techniques available to ASP.NET developers for implementing URL rewriting, and then turn to some real-world uses of URL rewriting. Before we delve into the technological specifics of URL rewriting, let's first take a look at some everyday scenarios where URL rewriting can be employed.


Common Uses of URL Rewriting


Creating data-driven ASP.NET websites often results in a single Web page that displays a subset of the database's data based on querystring parameters. For example, in designing an e-commerce site, one of your tasks would be to allow users to browse through the products for sale. To facilitate this, you might create a page called displayCategory.aspx that would display the products for a given category. The category's products to view would be specified by a querystring parameter. That is, if the user wanted to browse the Widgets for sale, and all Widgets had a had a CategoryID of 5, the user would visit: http://yousite.com/displayCategory.aspx?CategoryID=5.


There are two downsides to creating a website with such URLs. First, from the end user's perspective, the URL http://yousite.com/displayCategory.aspx?CategoryID=5 is a mess. Usability expert Jakob Neilsen recommends that URLs be chosen so that they:


  • Are short.

  • Are easy to type.

  • Visualize the site structure.

  • "Hackable," allowing the user to navigate through the site by hacking off parts of the URL.


I would add to that list that URLs should also be easy to remember. The URL http://yousite.com/displayCategory.aspx?CategoryID=5 meets none of Neilsen's criteria, nor is it easy to remember. Asking users to type in querystring values makes a URL hard to type and makes the URL "hackable" only by experienced Web developers who have an understanding of the purpose of querystring parameters and their name/value pair structure.


A better approach is to allow for a sensible, memorable URL, such as http://yoursite.com/products/Widgets. By just looking at the URL you can infer what will be displayed—information about Widgets. The URL is easy to remember and share, too. I can tell my colleague, "Check out yoursite.com/products/Widgets," and she'll likely be able to bring up the page without needing to ask me again what the URL was. (Try doing that with, say, an Amazon.com page!) The URL also appears, and should behave, "hackable." That is, if the user hacks of the end of the URL, and types in http://yoursite.com/products, they should see a listing of all products, or at least a listing of all categories of products they can view.


Note For a prime example of a "hackable" URL, consider the URLs generated by many blog engines. To view the posts for January 28, 2004, one visits a URL like http://someblog.com/2004/01/28. If the URL is hacked down to http://someblog.com/2004/01, the user will see all posts for January 2004. Cutting it down further to http://someblog.com/2004 will display all posts for the year 2004.


In addition to simplifying URLs, URL rewriting is also often used to handle website restructuring that would otherwise result in numerous broken links and outdated bookmarks.


What Happens When a Request Reaches IIS


Before we examine exactly how to implement URL rewriting, it's important that we have an understanding of how incoming requests are handled by Microsoft® Internet Information Services (IIS). When a request arrives at an IIS Web server, IIS examines the requested file's extension to determine how handle the request. Requests can be handled natively by IIS—as are HTML pages, images, and other static content—or IIS can route the request to an ISAPI extension. (An ISAPI extension is an unmanaged, compiled class that handles an incoming Web request. Its task is to generate the content for the requested resource.)


For example, if a request comes in for a Web page named Info.asp, IIS will route the message to the asp.dll ISAPI extension. This ISAPI extension will then load the requested ASP page, execute it, and return its rendered HTML to IIS, which will then send it back to the requesting client. For ASP.NET pages, IIS routes the message to the aspnet_isapi.dll ISAPI extension. The aspnet_isapi.dll ISAPI extension then hands off processing to the managed ASP.NET worker process, which processes the request, returning the ASP.NET Web page's rendered HTML.


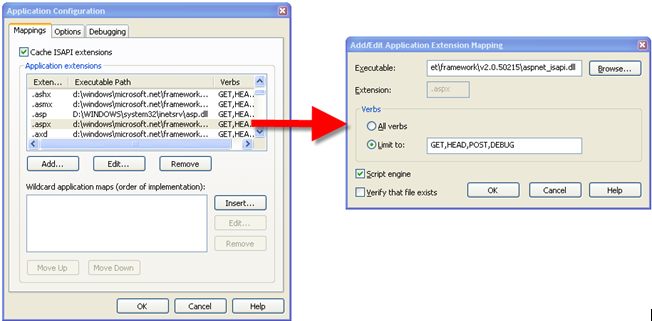
You can customize IIS to specify what extensions are mapped to what ISAPI extensions. Figure 1 shows the Application Configuration dialog box from the Internet Information Services Administrative Tool. Note that the ASP.NET-related extensions—.aspx, .ascx, .config, .asmx, .rem, .cs, .vb, and others—are all mapped to the aspnet_isapi.dll ISAPI extension.


1


Figure 1. Configured mappings for file extensions


A thorough discussion of how IIS manages incoming requests is a bit beyond the scope of this article. A great, in-depth discussion, though, can be found in Michele Leroux Bustamante's article Inside IIS and ASP.NET. It's important to understand that the ASP.NET engine gets its hands only on incoming Web requests whose extensions are explicitly mapped to the aspnet_isapi.dll in IIS.


Examining Requests with ISAPI Filters


In addition to mapping the incoming Web request's file extension to the appropriate ISAPI extension, IIS also performs a number of other tasks. For example, IIS attempts to authenticate the user making the request and determine if the authenticated user has authorization to access the requested file. During the lifetime of handling a request, IIS passes through several states. At each state, IIS raises an event that can be programmatically handled using ISAPI filters.


Like ISAPI extensions, ISAPI filters are blocks of unmanaged code installed on the Web server. ISAPI extensions are designed to generate the response for a request to a particular file type. ISAPI filters, on the other hand, contain code to respond to events raised by IIS. ISAPI filters can intercept and even modify the incoming and outgoing data. ISAPI filters have numerous applications, including:


  • Authentication and authorization.

  • Logging and monitoring.

  • HTTP compression.

  • URL rewriting.


While ISAPI filters can be used to perform URL rewriting, this article examines implementing URL rewriting using ASP.NET. However, we will discuss the tradeoffs between implementing URL rewriting as an ISAPI filter versus using techniques available in ASP.NET.


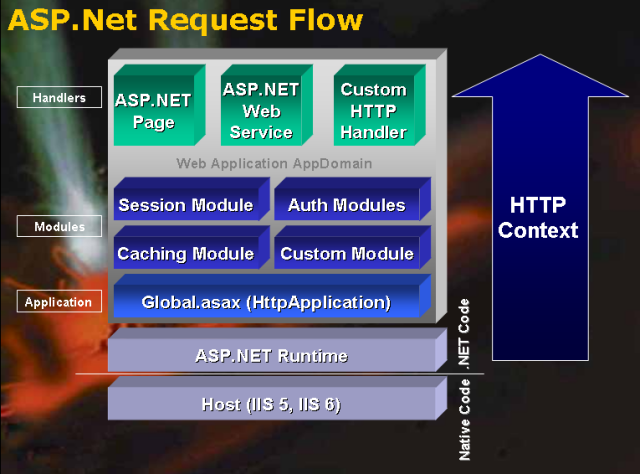
What Happens When a Request Enters the ASP.NET Engine


Prior to ASP.NET, URL rewriting on IIS Web servers needed to be implemented using an ISAPI filter. URL rewriting is possible with ASP.NET because the ASP.NET engine is strikingly similar to IIS. The similarities arise because the ASP.NET engine:


  1. Raises events as it processes a request.

  2. Allows an arbitrary number of HTTP modules handle the events that are raised, akin to IIS's ISAPI filters.

  3. Delegates rendering the requested resource to an HTTP handler, which is akin to IIS's ISAPI extensions.


Like IIS, during the lifetime of a request the ASP.NET engine fires events signaling its change from one state of processing to another. The BeginRequest event, for example, is fired when the ASP.NET engine first responds to a request. The AuthenticateRequest event fires next, which occurs when the identity of the user has been established. (There are numerous other events—AuthorizeRequest, ResolveRequestCache, and EndRequest, among others. These events are events of the System.Web.HttpApplication class; for more information consult the HttpApplication Class Overview technical documentation.)


As we discussed in the previous section, ISAPI filters can be created to respond to the events raised by IIS. In a similar vein, ASP.NET provides HTTP modules that can respond to the events raised by the ASP.NET engine. An ASP.NET Web application can be configured to have multiple HTTP modules. For each request processed by the ASP.NET engine, each configured HTTP module is initialized and allowed to wire up event handlers to the events raised during the processing of the request. Realize that there are a number of built-in HTTP modules utilized on each an every request. One of the built-in HTTP modules is the FormsAuthenticationModule, which first checks to see if forms authentication is being used and, if so, whether the user is authenticated or not. If not, the user is automatically redirected to the specified logon page.


Recall that with IIS, an incoming request is eventually directed to an ISAPI extension, whose job it is to return the data for the particular request. For example, when a request for a classic ASP Web page arrives, IIS hands off the request to the asp.dll ISAPI extension, whose task it is to return the HTML markup for the requested ASP page. The ASP.NET engine utilizes a similar approach. After initializing the HTTP modules, the ASP.NET engine's next task is to determine what HTTP handler should process the request.


All requests that pass through the ASP.NET engine eventually arrive at an HTTP handler or an HTTP handler factory (an HTTP handler factory simply returns an instance of an HTTP handler that is then used to process the request). The final HTTP handler renders the requested resource, returning the response. This response is sent back to IIS, which then returns it to the user that made the request.


ASP.NET includes a number of built-in HTTP handlers. The PageHandlerFactory, for example, is used to render ASP.NET Web pages. The WebServiceHandlerFactory is used to render the response SOAP envelopes for ASP.NET Web services. The TraceHandler renders the HTML markup for requests to trace.axd.


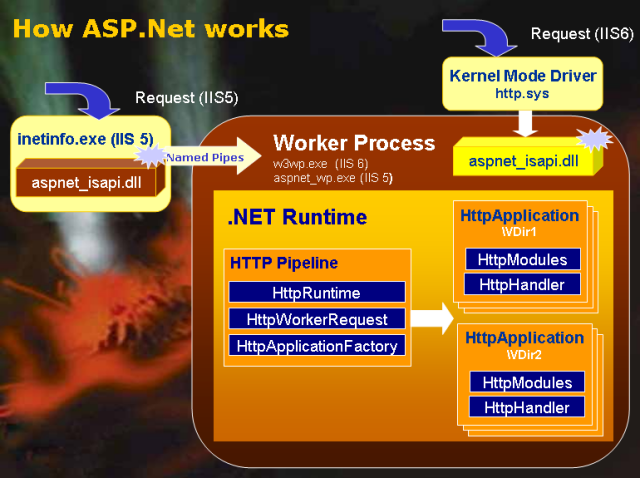
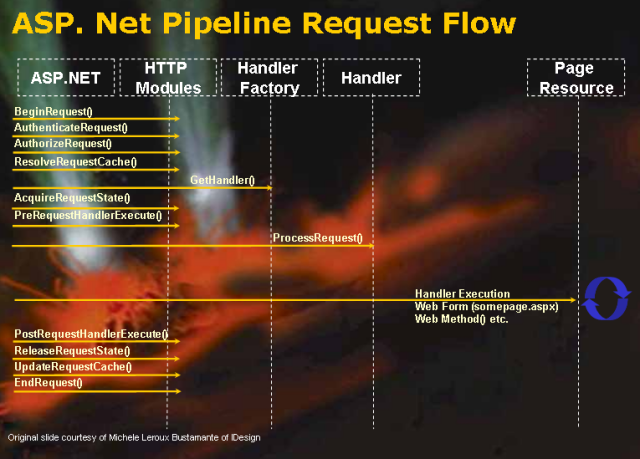
Figure 2 illustrates how a request for an ASP.NET resource is handled. First, IIS receives the request and dispatches it to aspnet_isapi.dll. Next, the ASP.NET engine initializes the configured HTTP modules. Finally, the proper HTTP handler is invoked and the requested resource is rendered, returning the generated markup back to IIS and back to the requesting client.


2


Figure 2. Request processing by IIS and ASP.NET


Creating and Registering Custom HTTP Modules and HTTP Handlers


Creating custom HTTP modules and HTTP handlers are relatively simple tasks, which involve created a managed class that implements the correct interface. HTTP modules must implement the System.Web.IHttpModule interface, while HTTP handlers and HTTP handler factories must implement the System.Web.IHttpHandler interface and System.Web.IHttpHandlerFactory interface, respectively. The specifics of creating HTTP handlers and HTTP modules is beyond the scope of this article. For a good background, read Mansoor Ahmed Siddiqui's article, HTTP Handlers and HTTP Modules in ASP.NET.


Once a custom HTTP module or HTTP handler has been created, it must be registered with the Web application. Registering HTTP modules and HTTP handlers for an entire Web server requires only a simple addition to the machine.config file; registering an HTTP module or HTTP handler for a specific Web application involves adding a few lines of XML to the application's Web.config file.


Specifically, to add an HTTP module to a Web application, add the following lines in the Web.config's configuration/system.web section:


<httpModules>     <add type="type" name="name" />  </httpModules>  

The type value provides the assembly and class name of the HTTP module, whereas the name value provides a friendly name by which the HTTP module can be referred to in the Global.asax file.


HTTP handlers and HTTP handler factories are configured by the <httpHandlers> tag in the Web.config's configuration/system.web section, like so:


<httpHandlers>     <add verb="verb" path="path" type="type" />  </httpHandlers>  

Recall that for each incoming request, the ASP.NET engine determines what HTTP handler should be used to render the request. This decision is made based on the incoming requests verb and path. The verb specifies what type of HTTP request was made—GET or POST—whereas the path specifies the location and filename of the file requested. So, if we wanted to have an HTTP handler handle all requests—either GET or POST—for files with the .scott extension, we'd add the following to the Web.config file:


<httpHandlers>     <add verb="*" path="*.scott" type="type" />  </httpHandlers>  

where type was the type of our HTTP handler.


Note When registering HTTP handlers, it is important to ensure that the extensions used by the HTTP handler are mapped in IIS to the ASP.NET engine. That is, in our .scott example, if the .scott extension is not mapped in IIS to the aspnet_isapi.dll ISAPI extension, a request for the file foo.scott will result in IIS attempting to return the contents of the file foo.scott. In order for the HTTP handler to process this request, the .scott extension must be mapped to the ASP.NET engine. The ASP.NET engine, then, will route the request correctly to the appropriate HTTP handler.

For more information on registering HTTP modules and HTTP handlers, be sure to consult the <httpModules> element documentation along with the <httpHandlers> element documentation.


Implementing URL Rewriting


URL rewriting can be implemented either with ISAPI filters at the IIS Web server level, or with either HTTP modules or HTTP handlers at the ASP.NET level. This article focuses on implementing URL rewriting with ASP.NET, so we won't be delving into the specifics of implementing URL rewriting with ISAPI filters. There are, however, numerous third-party ISAPI filters available for URL rewriting, such as:


Implementing URL rewriting at the ASP.NET level is possible through the System.Web.HttpContext class's RewritePath() method. The HttpContext class contains HTTP-specific information about a specific HTTP request. With each request received by the ASP.NET engine, an HttpContext instance is created for that request. This class has properties like: Request and Response, which provide access to the incoming request and outgoing response; Application and Session, which provide access to application and session variables; User, which provides information about the authenticated user; and other related properties.


With the Microsoft® .NET Framework Version 1.0, the RewritePath() method accepts a single string, the new path to use. Internally, the HttpContext class's RewritePath(string) method updates the Request object's Path and QueryString properties. In addition to RewritePath(string), the .NET Framework Version 1.1 includes another form of the RewritePath() method, one that accepts three string input parameters. This alternate overloaded form not only sets the Request object's Path and QueryString properties, but also sets internal member variables that are used to compute the Request object's values for its PhysicalPath, PathInfo, and FilePath properties.


To implement URL rewriting in ASP.NET, then, we need to create an HTTP module or HTTP handler that:


  1. Checks the requested path to determine if the URL needs to be rewritten.

  2. Rewrites the path, if needed, by calling the RewritePath() method.


For example, imagine that our website had information each employee, accessible through /info/employee.aspx?empID=employeeID. To make the URLs more "hackable," we might decide to have employee pages accessible by: /people/EmployeeName.aspx. Here is a case where we'd want to use URL rewriting. That is, when the page /people/ScottMitchell.aspx was requested, we'd want to rewrite the URL so that the page /info/employee.aspx?empID=1001 was used instead.


URL Rewriting with HTTP Modules


When performing URL rewriting at the ASP.NET level you can use either an HTTP module or an HTTP handler to perform the rewriting. When using an HTTP module, you must decide at what point during the request's lifecycle to check to see if the URL needs to be rewritten. At first glance, this may seem to be an arbitrary choice, but the decision can impact your application in both significant and subtle ways. The choice of where to perform the rewrite matters because the built-in ASP.NET HTTP modules use the Request object's properties to perform their duties. (Recall that rewriting the path alters the Request object's property values.) These germane built-in HTTP modules and the events they tie into are listed below:


HTTP Module Event Description
FormsAuthenticationModule AuthenticateRequest Determines if the user is authenticated using forms authentication. If not, the user is automatically redirected to the specified logon page.
FileAuthorizationMoudle AuthorizeRequest When using Windows authentication, this HTTP module checks to ensure that the Microsoft® Windows® account has adequate rights for the resource requested.
UrlAuthorizationModule AuthorizeRequest Checks to make sure the requestor can access the specified URL. URL authorization is specified through the <authorization> and <location> elements in the Web.config file.

Recall that the BeginRequest event fires before AuthenticateRequest, which fires before AuthorizeRequest.


One safe place that URL rewriting can be performed is in the BeginRequest event. That means that if the URL needs to be rewritten, it will have done so by the time any of the built-in HTTP modules run. The downside to this approach arises when using forms authentication. If you've used forms authentication before, you know that when the user visits a restricted resource, they are automatically redirected to a specified login page. After successfully logging in, the user is sent back to the page they attempted to access in the first place.


If URL rewriting is performed in the BeginRequest or AuthenticateRequest events, the login page will, when submitted, redirect the user to the rewritten page. That is, imagine that a user types into their browser window, /people/ScottMitchell.aspx, which is rewritten to /info/employee.aspx?empID=1001. If the Web application is configured to use forms authentication, when the user first visits /people/ScottMitchell.aspx, first the URL will be rewritten to /info/employee.aspx?empID=1001; next, the FormsAuthenticationModule will run, redirecting the user to the login page, if needed. The URL the user will be sent to upon successfully logging in, however, will be /info/employee.aspx?empID=1001, since that was the URL of the request when the FormsAuthenticationModule ran.


Similarly, when performing rewriting in the BeginRequest or AuthenticateRequest events, the UrlAuthorizationModule sees the rewritten URL. That means that if you use <location> elements in your Web.config file to specify authorization for specific URLs, you will have to refer to the rewritten URL.


To fix these subtleties, you might decide to perform the URL rewriting in the AuthorizeRequest event. While this approach fixes the URL authorization and forms authentication anomalies, it introduces a new wrinkle: file authorization no longer works. When using Windows authentication, the FileAuthorizationModule checks to make sure that the authenticated user has the appropriate access rights to access the specific ASP.NET page.


Imagine if a set of users does not have Windows-level file access to C:\Inetput\wwwroot\info\employee.aspx; if such users attempt to visit /info/employee.aspx?empID=1001, then they will get an authorization error. However, if we move the URL rewriting to the AuthenticateRequest event, when the FileAuthorizationModule checks the security settings, it still thinks the file being requested is /people/ScottMitchell.aspx, since the URL has yet to be rewritten. Therefore, the file authorization check will pass, allowing this user to view the content of the rewritten URL, /info/employee.aspx?empID=1001.


So, when should URL rewriting be performed in an HTTP module? It depends on what type of authentication you're employing. If you're not using any authentication, then it doesn't matter if URL rewriting happens in BeginRequest, AuthenticateRequest, or AuthorizeRequest. If you are using forms authentication and are not using Windows authentication, place the URL rewriting in the AuthorizeRequest event handler. Finally, if you are using Windows authentication, schedule the URL rewriting during the BeginRequest or AuthenticateRequest events.


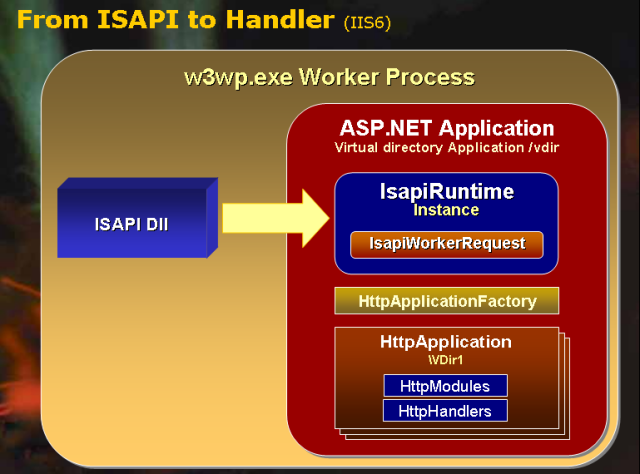
URL Rewriting in HTTP Handlers


URL rewriting can also be performed by an HTTP handler or HTTP handler factory. Recall that an HTTP handler is a class responsible for generating the content for a specific type of request; an HTTP handler factory is a class responsible for returning an instance of an HTTP handler that can generate the content for a specific type of request.


In this article we'll look at creating a URL rewriting HTTP handler factory for ASP.NET Web pages. HTTP handler factories must implement the IHttpHandlerFactory interface, which includes a GetHandler() method. After initializing the appropriate HTTP modules, the ASP.NET engine determines what HTTP handler or HTTP handler factory to invoke for the given request. If an HTTP handler factory is to be invoked, the ASP.NET engine calls that HTTP handler factory's GetHandler() method passing in the HttpContext for the Web request, along with some other information. The HTTP handler factory, then, must return an object that implements IHttpHandler that can handle the request.


To perform URL rewriting through an HTTP handler, we can create an HTTP handler factory whose GetHandler() method checks the requested path to determine if it needs to be rewritten. If it does, it can call the passed-in HttpContext object's RewritePath() method, as discussed earlier. Finally, the HTTP handler factory can return the HTTP handler returned by the System.Web.UI.PageParser class's GetCompiledPageInstance() method. (This is the same technique by which the built-in ASP.NET Web page HTTP handler factory, PageHandlerFactory, works.)


Since all of the HTTP modules will have been initialized prior to the custom HTTP handler factory being instantiated, using an HTTP handler factory presents the same challenges when placing the URL rewriting in the latter stages of the events—namely, file authorization will not work. So, if you rely on Windows authentication and file authorization, you will want to use the HTTP module approach for URL rewriting.


Over the next section we'll look at building a reusable URL rewriting engine. Following our examination of the URL rewriting engine—which is available in this article's code download—we'll spend the remaining two sections examining real-world uses of URL rewriting. First we'll look at how to use the URL rewriting engine and look at a simple URL rewriting example. Following that, we'll utilize the power of the rewriting engine's regular expression capabilities to provide truly "hackable" URLs.


Building a URL Rewriting Engine


To help illustrate how to implement URL rewriting in an ASP.NET Web application, I created a URL rewriting engine. This rewriting engine provides the following functionality:


  • The ASP.NET page developer utilizing the URL rewriting engine can specify the rewriting rules in the Web.config file.

  • The rewriting rules can use regular expressions to allow for powerful rewriting rules.

  • URL rewriting can be easily configured to use an HTTP module or an HTTP handler.


In this article we will examine URL rewriting with just the HTTP module. To see how HTTP handlers can be used to perform URL rewriting, consult the code available for download with this article.


Specifying Configuration Information for the URL Rewriting Engine


Let's examine the structure of the rewrite rules in the Web.config file. First, you'll need to indicate in the Web.config file if you want perform URL rewriting with the HTTP module or the HTTP handler. In the download, the Web.config file contains two entries that have been commented out:


<!--  <httpModules>     <add type="URLRewriter.ModuleRewriter, URLRewriter"           name="ModuleRewriter" />  </httpModules>  -->    <!--  <httpHandlers>     <add verb="*" path="*.aspx"           type="URLRewriter.RewriterFactoryHandler, URLRewriter" />  </httpHandlers>  -->  

Comment out the <httpModules> entry to use the HTTP module for rewriting; comment out the <httpHandlers> entry instead to use the HTTP handler for rewriting.


In addition to specifying whether the HTTP module or HTTP handler is used for rewriting, the Web.config file contains the rewriting rules. A rewriting rule is composed of two strings: the pattern to look for in the requested URL, and the string to replace the pattern with, if found. This information is expressed in the Web.config file using the following syntax:


<RewriterConfig>     <Rules>     <RewriterRule>        <LookFor>pattern to look for</LookFor>        <SendTo>string to replace pattern with</SendTo>     </RewriterRule>     <RewriterRule>        <LookFor>pattern to look for</LookFor>        <SendTo>string to replace pattern with</SendTo>     </RewriterRule>     ...     </Rules>  </RewriterConfig>  

Each rewrite rule is expressed by a <RewriterRule> element. The pattern to search for is specified by the <LookFor> element, while the string to replace the found pattern with is entered in the <SentTo> element. These rewrite rules are evaluated from top to bottom. If a match is found, the URL is rewritten and the search through the rewriting rules terminates.


When specifying patterns in the <LookFor> element, realize that regular expressions are used to perform the matching and string replacement. (In a bit we'll look at a real-world example that illustrates how to search for a pattern using regular expressions.) Since the pattern is a regular expression, be sure to escape any characters that are reserved characters in regular expressions. (Some of the regular expression reserved characters include: ., ?, ^, $, and others. These can be escaped by being preceded with a backslash, like \. to match a literal period.)


URL Rewriting with an HTTP Module


Creating an HTTP module is as simple as creating a class that implements the IHttpModule interface. The IHttpModule interface defines two methods:


  • Init(HttpApplication). This method fires when the HTTP module is initialized. In this method you'll wire up event handlers to the appropriate HttpApplication events.

  • Dispose(). This method is invoked when the request has completed and been sent back to IIS. Any final cleanup should be performed here.


To facilitate creating an HTTP module for URL rewriting, I started by creating an abstract base class, BaseModuleRewriter. This class implements IHttpModule. In the Init() event, it wires up the HttpApplication's AuthorizeRequest event to the BaseModuleRewriter_AuthorizeRequest method. The BaseModuleRewriter_AuthorizeRequest method calls the class's Rewrite() method passing in the requested Path along with the HttpApplication object that was passed into the Init() method. The Rewrite() method is abstract, meaning that in the BaseModuleRewriter class, the Rewrite() method has no method body; rather, the class being derived from BaseModuleRewriter must override this method and provide a method body.


With this base class in place, all we have to do now is to create a class derived from BaseModuleRewriter that overrides Rewrite() and performs the URL rewriting logic there. The code for BaseModuleRewriter is shown below.


public abstract class BaseModuleRewriter : IHttpModule  {     public virtual void Init(HttpApplication app)     {        // WARNING!  This does not work with Windows authentication!        // If you are using Windows authentication,         // change to app.BeginRequest        app.AuthorizeRequest += new            EventHandler(this.BaseModuleRewriter_AuthorizeRequest);     }       public virtual void Dispose() {}       protected virtual void BaseModuleRewriter_AuthorizeRequest(       object sender, EventArgs e)     {        HttpApplication app = (HttpApplication) sender;        Rewrite(app.Request.Path, app);     }       protected abstract void Rewrite(string requestedPath,        HttpApplication app);  }  

Notice that the BaseModuleRewriter class performs URL rewriting in the AuthorizeRequest event. Recall that if you use Windows authentication with file authorization, you will need to change this so that URL rewriting is performed in either the BeginRequest or AuthenticateRequest events.


The ModuleRewriter class extends the BaseModuleRewriter class and is responsible for performing the actual URL rewriting. ModuleRewriter contains a single overridden method—Rewrite()—which is shown below:


protected override void Rewrite(string requestedPath,      System.Web.HttpApplication app)  {     // get the configuration rules     RewriterRuleCollection rules =        RewriterConfiguration.GetConfig().Rules;       // iterate through each rule...     for(int i = 0; i < rules.Count; i++)     {        // get the pattern to look for, and         // Resolve the Url (convert ~ into the appropriate directory)        string lookFor = "^" +           RewriterUtils.ResolveUrl(app.Context.Request.ApplicationPath,           rules[i].LookFor) + "$";          // Create a regex (note that IgnoreCase is set...)        Regex re = new Regex(lookFor, RegexOptions.IgnoreCase);          // See if a match is found        if (re.IsMatch(requestedPath))        {           // match found - do any replacement needed           string sendToUrl =   RewriterUtils.ResolveUrl(app.Context.Request.ApplicationPath,               re.Replace(requestedPath, rules[i].SendTo));             // Rewrite the URL           RewriterUtils.RewriteUrl(app.Context, sendToUrl);           break;      // exit the for loop        }     }  }  

The Rewrite() method starts with getting the set of rewriting rules from the Web.config file. It then iterates through the rewrite rules one at a time, and for each rule, it grabs its LookFor property and uses a regular expression to determine if a match is found in the requested URL.


If a match is found, a regular expression replace is performed on the requested path with the value of the SendTo property. This replaced URL is then passed into the RewriterUtils.RewriteUrl() method. RewriterUtils is a helper class that provides a couple of static methods used by both the URL rewriting HTTP module and HTTP handler. The RewriterUrl() method simply calls the HttpContext object's RewriteUrl() method.


Note You may have noticed that when performing the regular expression match and replacement, a call to RewriterUtils.ResolveUrl() is made. This helper method simply replaces any instances of ~ in the string with the value of the application's path.

The entire code for the URL rewriting engine is available for download with this article. We've examined the most germane pieces, but there are other components as well, such as classes for deserializing the XML-formatted rewriting rules in the Web.config file into an object, as well as the HTTP handler factory for URL rewriting. The remaining three sections of this article examine real-world uses of URL rewriting.


Performing Simple URL Rewriting with the URL Rewriting Engine


To demonstrate the URL rewriting engine in action, let's build an ASP.NET Web application that utilizes simple URL rewriting. Imagine that we work for a company that sells assorted products online. These products are broken down into the following categories:


Category ID Category Name
1 Beverages
2 Condiments
3 Confections
4 Dairy Products
... ...

Assume we already have created an ASP.NET Web page called ListProductsByCategory.aspx that accepts a Category ID value in the querystring and displays all of the products belonging to that category. So, users who wanted to view our Beverages for sale would visit ListProductsByCategory.aspx?CategoryID=1, while users who wanted to view our Dairy Products would visit ListProductsByCategory.aspx?CategoryID=4. Also assume we have a page called ListCategories.aspx, which lists the categories of products for sale.


Clearly this is a case for URL rewriting, as the URLs a user is presented with do not carry any significance for the user, nor do they provide any "hackability." Rather, let's employ URL rewriting so that when a user visits /Products/Beverages.aspx, their URL will be rewritten to ListProductsByCategory.aspx?CategoryID=1. We can accomplish this with the following URL rewriting rule in the Web.config file:


<RewriterConfig>     <Rules>        <!-- Rules for Product Lister -->        <RewriterRule>           <LookFor>~/Products/Beverages\.aspx</LookFor>           <SendTo>~/ListProductsByCategory.aspx?CategoryID=1</SendTo>        </RewriterRule>        <RewriterRule>     </Rules>  </RewriterConfig>  

As you can see, this rule searches to see if the path requested by the user was /Products/Beverages.aspx. If it was, it rewrites the URL as /ListProductsByCategory.aspx?CategoryID=1.


Note Notice that the <LookFor> element escapes the period in Beverages.aspx. This is because the <LookFor> value is used in a regular expression pattern, and period is a special character in regular expressions meaning "match any character," meaning a URL of /Products/BeveragesQaspx, for example, would match. By escaping the period (using \.) we are indicating that we want to match a literal period, and not any old character.

With this rule in place, when a user visits /Products/Beverages.aspx, they will be shown the beverages for sale. Figure 3 shows a screenshot of a browser visiting /Products/Beverages.aspx. Notice that in the browser's Address bar the URL reads /Products/Beverages.aspx, but the user is actually seeing the contents of ListProductsByCategory.aspx?CategoryID=1. (In fact, there doesn't even exist a /Products/Beverages.aspx file on the Web server at all!)


3


Figure 3. Requesting category after rewriting URL


Similar to /Products/Beverages.aspx, we'd next add rewriting rules for the other product categories. This simply involves adding additional <RewriterRule> elements within the <Rules> element in the Web.config file. Consult the Web.config file in the download for the complete set of rewriting rules for the demo.


To make the URL more "hackable," it would be nice if a user could simply hack off the Beverages.aspx from /Products/Beverages.aspx and be shown a listing of the product categories. At first glance, this may appear a trivial task—just add a rewriting rule that maps /Products/ to /ListCategories.aspx. However, there is a fine subtlety—you must first create a /Products/ directory and add an empty Default.aspx file in the /Products/ directory.


To understand why these extra steps need to be performed, recall that the URL rewriting engine is at the ASP.NET level. That is, if the ASP.NET engine is never given the opportunity to process the request, there's no way the URL rewriting engine can inspect the incoming URL. Furthermore, remember that IIS hands off incoming requests to the ASP.NET engine only if the requested file has an appropriate extension. So if a user visits /Products/, IIS doesn't see any file extension, so it checks the directory to see if there exists a file with one of the default filenames. (Default.aspx, Default.htm, Default.asp, and so on. These default filenames are defined in the Documents tab of the Web Server Properties dialog box in the IIS Administration dialog box.) Of course, if the /Products/ directory doesn't exist, IIS will return an HTTP 404 error.


So, we need to create the /Products/ directory. Additionally, we need to create a single file in this directory, Default.aspx. This way, when a user visits /Products/, IIS will inspect the directory, see that there exists a file named Default.aspx, and then hand off processing to the ASP.NET engine. Our URL rewriter, then, will get a crack at rewriting the URL.


After creating the directory and Default.aspx file, go ahead and add the following rewriting rule to the <Rules> element:


<RewriterRule>     <LookFor>~/Products/Default\.aspx</LookFor>     <SendTo>~/ListCategories.aspx</SendTo>  </RewriterRule>  

With this rule in place, when a user visits /Products/ or /Products/Default.aspx, they will see the listing of product categories, shown in Figure 4.


4


Figure 4. Adding "hackability" to the URL


Handling Postbacks


If the URLs you are rewriting contain a server-side Web Form and perform postbacks, when the form posts back, the underlying URL will be used. That is, if our user enters into their browser, /Products/Beverages.aspx, they will still see in their browser's Address bar, /Products/Beverages.aspx, but they will be shown the content for ListProductsByCategory.aspx?CategoryID=1. If ListProductsByCategory.aspx performs a postback, the user will be posted back to ListProductsByCategory.aspx?CategoryID=1, not /Products/Beverages.aspx. This won't break anything, but it can be disconcerting from the user's perspective to see the URL change suddenly upon clicking a button.


The reason this behavior happens is because when the Web Form is rendered, it explicitly sets its action attribute to the value of the file path in the Request object. Of course, by the time the Web Form is rendered, the URL has been rewritten from /Products/Beverages.aspx to ListProductsByCategory.aspx?CategoryID=1, meaning the Request object is reporting that the user is visiting ListProductsByCategory.aspx?CategoryID=1. This problem can be fixed by having the server-side form simply not render an action attribute. (Browsers, by default, will postback if the form doesn't contain an action attribute.)


Unfortunately, the Web Form does not allow you to explicitly specify an action attribute, nor does it allow you to set some property to disable the rendering of the action attribute. Rather, we'll have to extend the System.Web.HtmlControls.HtmlForm class ourselves, overriding the RenderAttribute() method and explicitly indicating that it not render the action attribute.


Thanks to the power of inheritance, we can gain all of the functionality of the HtmlForm class and only have to add a scant few lines of code to achieve the desired behavior. The complete code for the custom class is shown below:


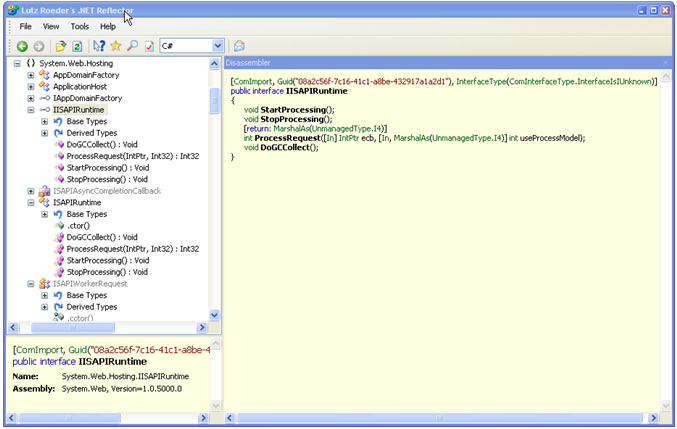
namespace ActionlessForm {    public class Form : System.Web.UI.HtmlControls.HtmlForm    {       protected override void RenderAttributes(HtmlTextWriter writer)       {          writer.WriteAttribute("name", this.Name);          base.Attributes.Remove("name");            writer.WriteAttribute("method", this.Method);          base.Attributes.Remove("method");            this.Attributes.Render(writer);            base.Attributes.Remove("action");            if (base.ID != null)             writer.WriteAttribute("id", base.ClientID);       }    }  }  

The code for the overridden RenderAttributes() method simply contains the exact code from the HtmlForm class's RenderAttributes() method, but without setting the action attribute. (I used Lutz Roeder's Reflector to view the source code of the HtmlForm class.)


Once you have created this class and compiled it, to use it in an ASP.NET Web application, start by adding it to the Web application's References folder. Then, to use it in place of the HtmlForm class, simply add the following to the top of your ASP.NET Web page:


<%@ Register TagPrefix="skm" Namespace="ActionlessForm"      Assembly="ActionlessForm" %>  

Then, where you have <form runat="server">, replace that with:


<skm:Form id="Form1" method="post" runat="server">  

and replace the closing </form> tag with:


</skm:Form>  

You can see this custom Web Form class in action in ListProductsByCategory.aspx, which is included in this article's download. Also included in the download is a Visual Studio .NET project for the action-less Web Form.


Note If the URL you are rewriting to does not perform a postback, there's no need to use this custom Web Form class.

Creating Truly "Hackable" URLs


The simple URL rewriting demonstrated in the previous section showed how easily the URL rewriting engine can be configured with new rewriting rules. The true power of the rewriting rules, though, shines when using regular expressions, as we'll see in this section.


Blogs are becoming more and more popular these days, and it seems everyone has their own blog. If you are not familiar with blogs, they are often-updated personal pages that typically serve as an online journal. Most bloggers simply write about their day-to-day happenings, others focus on blogging about a specific theme, such as movie reviews, a sports team, or a computer technology.


Depending on the author, blogs are updated anywhere from several times a day to once every week or two. Typically the blog homepage shows the most recent 10 entries, but virtually all blogging software provides an archive through which visitors can read older postings. Blogs are a great application for "hackable" URLs. Imagine while searching through the archives of a blog you found yourself at the URL /2004/02/14.aspx. Would you be terribly surprised if you found yourself reading the posts made on February 14th, 2004? Furthermore, you might want to view all posts for February 2004, in which case you might try hacking the URL to /2004/02/. To view all 2004 posts, you might try visiting /2004/.


When maintaining a blog, it would be nice to provide this level of URL "hackability" to your visitors. While many blog engines provide this functionality, let's look at how it can be accomplished using URL rewriting.


First, we need a single ASP.NET Web page that will show blog entries by day, month, or year. Assume we have such a page, ShowBlogContent.aspx, that takes in querystring parameters year, month, and day. To view the posts for February 14th, 2004, we could visit ShowBlogContent.aspx?year=2004&month=2&day=14. To view all posts for February 2004, we'd visit ShowBlogContent.aspx?year=2004&month=2. Finally, to see all posts for the year 2004, we'd navigate to ShowBlogContent.aspx?year=2004. (The code for ShowBlogContent.aspx can be found in this article's download.)


So, if a user visits /2004/02/14.aspx, we need to rewrite the URL to ShowBlogContent.aspx?year=2004&month=2&day=14. All three cases—when the URL specifies a year, month, and day; when the URL specifies just the year and month; and when the URL specifies only the yea—can be handled with three rewrite rules:


<RewriterConfig>     <Rules>        <!-- Rules for Blog Content Displayer -->        <RewriterRule>           <LookFor>~/(\d{4})/(\d{2})/(\d{2})\.aspx</LookFor>           <SendTo>~/ShowBlogContent.aspx?year=$1&amp;month=$2&day=$3</SendTo>        </RewriterRule>        <RewriterRule>           <LookFor>~/(\d{4})/(\d{2})/Default\.aspx</LookFor>           <SendTo><![CDATA[~/ShowBlogContent.aspx?year=$1&month=$2]]></SendTo>        </RewriterRule>        <RewriterRule>           <LookFor>~/(\d{4})/Default\.aspx</LookFor>           <SendTo>~/ShowBlogContent.aspx?year=$1</SendTo>        </RewriterRule>     </Rules>  </RewriterConfig>  

These rewriting rules demonstrate the power of regular expressions. In the first rule, we look for a URL with the pattern (\d{4})/(\d{2})/(\d{2})\.aspx. In plain English, this matches a string that has four digits followed by a forward slash followed by two digits followed by a forward slash, followed by two digits followed by .aspx. The parenthesis around each digit grouping is vital—it allows us to refer to the matched characters inside those parentheses in the corresponding <SendTo> property. Specifically, we can refer back to the matched parenthetical groupings using $1, $2, and $3 for the first, second, and third parenthesis grouping, respectively.


Note Since the Web.config file is XML-formatted, characters like &, <, and > in the text portion of an element must be escaped. In the first rule's <SendTo> element, & is escaped to &amp;amp;. In the second rule's <SendTo>, an alternative technique is used—by using a <![CDATA[...]]> element, the contents inside do not need to be escaped. Either approach is acceptable and accomplishes the same end.

Figures 5, 6, and 7 show the URL rewriting in action. The data is actually being pulled from my blog, http://ScottOnWriting.NET. In Figure 5, the posts for November 7, 2003 are shown; in Figure 6 all posts for November 2003 are shown; Figure 7 shows all posts for 2003.


5


Figure 5. Posts for November 7, 2003


5


Figure 6. All posts for November 2003


6


Figure 7. All posts for 2003


Note The URL rewriting engine expects a regular expression pattern in the <LookFor> elements. If you are unfamiliar with regular expressions, consider reading an earlier article of mine, An Introduction to Regular Expressions. Also, a great place to get your hands on commonly used regular expressions, as well as a repository for sharing your own crafted regular expressions, is RegExLib.com.

Building the Requisite Directory Structure


When a request comes in for /2004/03/19.aspx, IIS notes the .aspx extension and routes the request to the ASP.NET engine. As the request moves through the ASP.NET engine's pipeline, the URL will get rewritten to ShowBlogContent.aspx?year=2004&month=03&day=19 and the visitor will see those blog entries for March 19, 2004. But what happens when the user navigates to /2004/03/? Unless there is a directory /2004/03/, IIS will return a 404 error. Furthermore, there needs to be a Default.aspx page in this directory so that the request is handed off to the ASP.NET engine.


So with this approach, you have to manually create a directory for each year in which there are blog entries, with a Default.aspx page in the directory. Additionally, in each year directory you need to manually create twelve more directories—01, 02, …, 12—each with a Default.aspx file. (Recall that we had to do the same thing—add a /Products/ directory with a Default.aspx file—in the previous demo so that visiting /Products/ correctly displayed ListCategories.aspx.)


Clearly, adding such a directory structure can be a pain. A workaround to this problem is to have all incoming IIS requests map to the ASP.NET engine. This way, even if when visiting the URL /2004/03/, IIS will faithfully hand off the request to the ASP.NET engine even if there does not exist a /2004/03/ directory. Using this approach, however, makes the ASP.NET engine responsible for handling all types of incoming requests to the Web server, including images, CSS files, external JavaScript files, Macromedia Flash files, and so on.


A thorough discussion of handling all file types is far beyond the scope of this article. For an example of an ASP.NET Web application that uses this technique, though, look into .Text, an open-source blog engine. .Text can be configured to have all requests mapped to the ASP.NET engine. It can handle serving all file types by using a custom HTTP handler that knows how to serve up typical static file types (images, CSS files, and so on).


Conclusion


In this article we examined how to perform URL rewriting at the ASP.NET-level through the HttpContext class's RewriteUrl() method. As we saw, RewriteUrl() updates the particular HttpContext's Request property, updating what file and path is being requested. The net effect is that, from the user's perspective, they are visiting a particular URL, but actually a different URL is being requested on the Web server side.


URLs can be rewritten either in an HTTP module or an HTTP handler. In this article we examined using an HTTP module to perform the rewriting, and looked at the consequences of performing the rewriting at different stages in the pipeline.


Of course, with ASP.NET-level rewriting, the URL rewriting can only happen if the request is successfully handed off from IIS to the ASP.NET engine. This naturally occurs when the user requests a page with a .aspx extension. However, if you want the person to be able to enter a URL that might not actually exist, but would rather rewrite to an existing ASP.NET page, you have to either create mock directories and Default.aspx pages, or configure IIS so that all incoming requests are blindly routed to the ASP.NET engine.


Related Books


ASP.NET: Tips, Tutorials, and Code


Microsoft ASP.NET Coding Strategies with the Microsoft ASP.NET Team


Essential ASP.NET with Examples in C#


Works consulted


URL rewriting is a topic that has received a lot of attention both for ASP.NET and competing server-side Web technologies. The Apache Web server, for instance, provides a module for URL rewriting called mod_rewrite. mod_rewrite is a robust rewriting engine, providing rewriting rules based on conditions such as HTTP headers and server variables, as well as rewriting rules that utilize regular expressions. For more information on mod_rewrite, check out A User's Guide to URL Rewriting with the Apache Web Server.


There are a number of articles on URL rewriting with ASP.NET. Rewrite.NET - A URL Rewriting Engine for .NET examines creating a URL rewriting engine that mimics mod_rewrite's regular expression rules. URL Rewriting With ASP.NET also gives a good overview of ASP.NET's URL rewriting capabilities. Ian Griffiths has a blog entry on some of the caveats associated with URL rewriting with ASP.NET, such as the postback issue discussed in this article. Both Fabrice Marguerie (read more) and Jason Salas (read more) have blog entires on using URL rewriting to boost search engine placement.


About the author

Scott Mitchell, author of five books and founder of 4GuysFromRolla.com, has been working with Microsoft Web technologies for the past five years. Scott works as an independent consultant, trainer, and writer. He can be reached at mitchell@4guysfromrolla.com or through his blog, which can be found at http://ScottOnWriting.NET.

A Matter of Context

A Matter of Context


Susan Warren
Microsoft Corporation

January 14, 2002

One of the most common problems with writing Web applications is letting your code know the context in which it's being executed. Let's look at a simple example—personalizing a page—that illustrates this problem:


Please sign in.

vs.

Welcome Susan!

Seems simple enough, but even this tiny bit of Web UI requires a couple of bits of information that will vary each time the page is requested. I'll need to know:


1. Is the user signed in?

2. What is the user's display name?


More generally, what is the unique context each time the page is requested? And how can I write my code so that it takes this information into account?

In fact, due to the stateless nature of HTTP, there are many different pieces of context a Web application might need to track. When a user interacts with a Web application, the browser sends a series of independent HTTP requests to the Web server. The application itself has to do the work of knitting these requests into a pleasing experience for the user and knowing the context of the request is critical.

ASP introduced several intrinsic objects like Request and Application to help track the context for an HTTP request. ASP.NET takes the next step and bundles these objects, plus several additional context-related objects into an extremely handy intrinsic object called Context.

Context is an object of type System.Web.HttpContext. It is exposed as a property of the ASP.NET Page class. It's also available from user controls and your business objects (more on that later). Here's a partial list of the objects rolled up by HttpContext:


Object
Description


Application
A key/value pair collection of values that is accessible by every user of the application. Application is of type System.Web.HttpApplicationState.


ApplicationInstance
The actual running application, which exposes some request processing events. These events are handled in Global.asax, or an HttpHandler or HttpModule.


Cache
The ASP.NET Cache object, which provides programmatic access to the cache. Rob Howard's ASP.NET Caching column provides a good introduction to caching.


Error
The first error (if any) encountered while processing the page. See Rob's Exception to the Rule, Part 1 for more information.


Items
A key-value pair collection that you can use to pass information between all of the components that participate in the processing of a single request. Items is of type System.Collections.IDictionary.


Request
Information about the HTTP request, including browser information, cookies, and values passed in a form or on the query string. Request is of type System.Web.HttpRequest.


Response
Settings and content for creating the HTTP response. Request is of type System.Web.HttpResponse.


Server
Server is a utility class with several useful helper methods, including Server.Execute(), Server.MapPath(), and Server.HtmlEncode(). Server is an object of type System.Web.HttpServerUtility.


Session
A key/value pair collection of values that are accessible by a single user of the application. Application is of type System.Web.HttpSessionState.


Trace
The ASP.NET Trace object, which provides access to tracing functionality. See Rob's Tracing article for more information.


User
The security context of the current user, if authenticated. Context.User.Identity is the user's name. User is an object of type System.Security.Principal.IPrincipal.


If you're an ASP developer, some of the objects above will look quite familiar. There are a few enhancements, but for the most part, they work exactly the same in ASP.NET as in ASP.

Context Basics

Some of the objects in Context are also promoted as top-level objects on Page. For example, Page.Context.Response and Page.Response reference the same object so the following code is equivalent:

[Visual Basic® Web Form]

Response.Write ("Hello ")
Context.Response.Write ("There")


[C# Web Form]

Response.Write ("Hello ");
Context.Response.Write ("There");


You can also use the Context object from your business objects. HttpContext.Current is a static property that conveniently returns the context for the current request. This is useful in all kinds of ways, but here's a simple example of retrieving an item from the cache in your business class:

[Visual Basic]

' get the request context
Dim _context As HttpContext = HttpContext.Current

' get dataset from the cache
Dim _data As DataSet = _context.Cache("MyDataSet")


[C#]

// get the request context
HttpContext _context = HttpContext.Current;

// get dataset from cache
DataSet _data = _context.Cache("MyDataSet");


Context in Action

The Context object provides The Answer to several common ASP.NET "How Do I ...?" questions. Perhaps the best way to communicate just how valuable this gem can be is to show it in action. Here are a few of the best Context tricks I know.

How Do I Emit an ASP.NET Trace Statement From My Business Class?

Answer: Easy! Use HttpContext.Current to get the Context object, then call Context.Trace.Write().

[Visual Basic]

Imports System
Imports System.Web

Namespace Context

' Demonstrates emitting an ASP.NET trace statement from a
' business class.

Public Class TraceEmit

Public Sub SomeMethod()

' get the request context
Dim _context As HttpContext = HttpContext.Current

' use context to write the trace statement
_context.Trace.Write("in TraceEmit.SomeMethod")

End Sub

End Class

End Namespace


[C#]

using System;
using System.Web;

namespace Context
{
// Demonstrates emitting an ASP.NET trace statement from a
// business class.

public class TraceEmit
{

public void SomeMethod() {

// get the request context
HttpContext _context = HttpContext.Current;

// use context to write the trace statement
_context.Trace.Write("in TraceEmit.SomeMethod");
}
}
}


How Can I Access a Session State Value From My Business Class?

Answer: Easy! Use HttpContext.Current to get the Context object, then access Context.Session.

[Visual Basic]

Imports System
Imports System.Web

Namespace Context

' Demonstrates accessing the ASP.NET Session intrinsic
' from a business class.

Public Class UseSession

Public Sub SomeMethod()

' get the request context
Dim _context As HttpContext = HttpContext.Current

' access the Session intrinsic
Dim _value As Object = _context.Session("TheValue")

End Sub

End Class

End Namespace


[C#]

using System;
using System.Web;

namespace Context
{
// Demonstrates accessing the ASP.NET Session intrinsic
// from a business class.

public class UseSession
{

public void SomeMethod() {

// get the request context
HttpContext _context = HttpContext.Current;

// access the Session intrinsic
object _value = _context.Session["TheValue"];
}
}
}


How Can I Add a Standard Header and Footer to Every Page in My Application?

Answer: Handle the application's BeginRequest and EndRequest events, and use Context.Response.Write to emit the HTML for the header and footer.

Technically, you can handle the application events like BeginRequest in either an HttpModule or by using Global.asax. HttpModules are a bit harder to write, and aren't typically used for functionality that is used by a single application, as in this example. So, we'll use the application-scoped Global.asax file instead.

As with an ASP page, several of the ASP.NET context intrinsics are promoted to be properties of the HttpApplication class, from which the class representing Global.asax inherits. We won't need to use HttpContext.Current to get a reference to the Context object; it's already available in Global.asax.

In this example, I'm putting the and tags, plus a horizontal rule into the header section, and another horizontal rule plus the end tags for these into the footer section. The footer also contains a copyright message. The result looks like the figure below:


Figure 1. Example of standard header and footer as rendered in the browser

This is a trivial example, but you can easily extend this to include your standard header and navigation, or simply output the

statements for these. One caveat—if you want the header or footer to include interactive content, you should consider using ASP.NET user controls instead.

[SomePage.aspx source—sample content]


Normal Page Content


[Visual Basic Global.asax]

<%@ Application Language="VB" %>


[C# Global.asax]

<%@ Application Language="C#" %>


How Can I Show A Welcome Message When The User Is Authenticated?

The Answer: Test the User context object to see if the user is authenticated. If so, get the user's name from the User object too. This is, of course, the example from the beginning of the article.

[Visual Basic]


[C#]


And Now for Something Really Wonderful: Context.Items

I hope the examples above show how much easier it is to write your Web application with a little context information at hand. Wouldn't it be great to be able to access some context that is unique to your application in the same way?

That's the purpose of the Context.Items collection. It holds your application's request-specific values in a way that is available to every part of your code that participates in the processing of a request. For example, the same piece of information can be used in Global.asax, in your ASPX page, in the user controls within the page, and by the business logic the page calls.

Consider the IBuySpy Portal sample application. It uses a single main page—DesktopDefault.aspx—to display portal content. Which content is displayed depends on which tab is selected, as well as the roles of the user, if authenticated.


Figure 2. IbuySpy home page

The querystring includes the TabIndex and TabId parameters for the tab being requested. This information is used throughout the processing of the request to filter which data is displayed to the user. http://www.ibuyspy.com/portal/DesktopDefault.aspx?tabindex=1&tabid=2

To use a querystring value, you need to first make sure it's a valid value and, if not, do a little error handling. It's not a lot of code, but do you really want to duplicate it in every page and component that uses the value? Of course not! In the Portal sample it is even more involved since there is other information that can be preloaded once we know the TabId.

The Portal uses the querystring values as parameters to construct a new "PortalSettings" object and add it to Context.Items in the BeginRequest event in Global.asax. Since the begin request is executed at the beginning of each request, this makes the tab-related values available to all of the pages and components in the application. When the request is complete, the object is automatically discarded—very tidy!

[Visual Basic Global.asax]

Sub Application_BeginRequest(sender As [Object], e As EventArgs)

Dim tabIndex As Integer = 0
Dim tabId As Integer = 0

' Get TabIndex from querystring
If Not (Request.Params("tabindex") Is Nothing) Then
tabIndex = Int32.Parse(Request.Params("tabindex"))
End If

' Get TabID from querystring
If Not (Request.Params("tabid") Is Nothing) Then
tabId = Int32.Parse(Request.Params("tabid"))
End If

Context.Items.Add("PortalSettings", _
New PortalSettings(tabIndex, tabId))

End Sub


[C# Global.asax]

void Application_BeginRequest(Object sender, EventArgs e) {

int tabIndex = 0;
int tabId = 0;

// Get TabIndex from querystring

if (Request.Params["tabindex"] != null) {
tabIndex = Int32.Parse(Request.Params["tabindex"]);
}

// Get TabID from querystring

if (Request.Params["tabid"] != null) {
tabId = Int32.Parse(Request.Params["tabid"]);
}

Context.Items.Add("PortalSettings",
new PortalSettings(tabIndex, tabId));
}


The DesktopPortalBanner.ascx user control pulls the PortalSetting's object from Context to access the Portal's name and security settings. In fact, this one module is a great all-around example of Context in action. To illustrate the point, I've simplified the code a little, and marked all of the places either HTTP or application-specific Context is accessed in bold.

[C# DesktopPortalBanner.ascx]

<%@ Import Namespace="ASPNetPortal" %>
<%@ Import Namespace="System.Data.SqlClient" %>


Request.ApplicationPath %>">Portal Home
|
Request.ApplicationPath %>/Docs/Docs.asp">
Portal Documentation
<%= LogoffLink %>


Request.ApplicationPath %>
/DesktopDefault.aspx?tabindex=<%# Container.ItemIndex %>&tabid=
<%# ((TabStripDetails) Container.DataItem).TabId %>'>
<%# ((TabStripDetails) Container.DataItem).TabName %>
&nbsp;


<%# ((TabStripDetails) Container.DataItem).TabName %>


You can browse and run the complete source for the IBuySpy portal online in both Visual Basic and C# at http://www.ibuyspy.com, or download it and run it yourself.

Summary

Context is another one of those "good things get even better in ASP.NET" features. It extends the already great context support of ASP to add both hooks into the new runtime features of ASP.NET. Plus it adds Context.Items as a new state mechanism for very short-lived values. But the ultimate benefit to you as a developer is more compact, easier to maintain code, and that's a context we can all get behind.

A low-level Look at the ASP.NET Architecture

By Rick Strahl

www.west-wind.com

rstrahl@west-wind.com


Last Update:


August 29, 2005


Other Links:


Download Examples for this article

Leave a Comment or Question


ASP.NET is a powerful platform for building Web applications, that provides a tremendous amount of flexibility and power for building just about any kind of Web application. Most people are familiar only with the high level frameworks like WebForms and WebServices which sit at the very top level of the ASP.NET hierarchy. In this article I’ll describe the lower level aspects of ASP.NET and explain how requests move from Web Server to the ASP.NET runtime and then through the ASP.NET Http Pipeline to process requests.


To me understanding the innards of a platform always provides certain satisfaction and level of comfort, as well as insight that helps to write better applications. Knowing what tools are available and how they fit together as part of the whole complex framework makes it easier to find the best solution to a problem and more importantly helps in troubleshooting and debugging of problems when they occur. The goal of this article is to look at ASP.NET from the System level and help understand how requests flow into the ASP.NET processing pipeline. As such we’ll look at the core engine and how Web requests end up there. Much of this information is not something that you need to know in your daily work, but it’s good to understand how the ASP.NET architecture routes request into your application code that usually sits at a much higher level.


Most people using ASP.NET are familiar with WebForms and WebServices. These high level implementations are abstractions that make it easy to build Web based application logic and ASP.NET is the driving engine that provides the underlying interface to the Web Server and routing mechanics to provide the base for these high level front end services typically used for your applications. WebForms and WebServices are merely two very sophisticated implementations of HTTP Handlers built on top of the core ASP.NET framework.


However, ASP.NET provides much more flexibility from a lower level. The HTTP Runtime and the request pipeline provide all the same power that went into building the WebForms and WebService implementations – these implementations were actually built with .NET managed code. And all of that same functionality is available to you, should you decide you need to build a custom platform that sits at a level a little lower than WebForms.


WebForms are definitely the easiest way to build most Web interfaces, but if you’re building custom content handlers, or have special needs for processing the incoming or outgoing content, or you need to build a custom application server interface to another application, using these lower level handlers or modules can provide better performance and more control over the actual request process. With all the power that the high level implementations of WebForms and WebServices provide they also add quite a bit of overhead to requests that you can bypass by working at a lower level.


What is ASP.NET


Let’s start with a simple definition: What is ASP.NET? I like to define ASP.NET as follows:


ASP.NET is a sophisticated engine using Managed Code for front to back processing of Web Requests.


It's much more than just WebForms and Web Services…


ASP.NET is a request processing engine. It takes an incoming request and passes it through its internal pipeline to an end point where you as a developer can attach code to process that request. This engine is actually completely separated from HTTP or the Web Server. In fact, the HTTP Runtime is a component that you can host in your own applications outside of IIS or any server side application altogether. For example, you can host the ASP.NET runtime in a Windows form (check out http://www.west-wind.com/presentations/aspnetruntime/aspnetruntime.asp for more detailed information on runtime hosting in Windows Forms apps).


The runtime provides a complex yet very elegant mechanism for routing requests through this pipeline. There are a number of interrelated objects, most of which are extensible either via subclassing or through event interfaces at almost every level of the process, so the framework is highly extensible. Through this mechanism it’s possible to hook into very low level interfaces such as the caching, authentication and authorization. You can even filter content by pre or post processing requests or simply route incoming requests that match a specific signature directly to your code or another URL. There are a lot of different ways to accomplish the same thing, but all of the approaches are straightforward to implement, yet provide flexibility in finding the best match for performance and ease of development.


The entire ASP.NET engine was completely built in managed code and all extensibility is provided via managed code extensions.


The entire ASP.NET engine was completely built in managed code and all of the extensibility functionality is provided via managed code extensions. This is a testament to the power of the .NET framework in its ability to build sophisticated and very performance oriented architectures. Above all though, the most impressive part of ASP.NET is the thoughtful design that makes the architecture easy to work with, yet provides hooks into just about any part of the request processing.


With ASP.NET you can perform tasks that previously were the domain of ISAPI extensions and filters on IIS – with some limitations, but it’s a lot closer than say ASP was. ISAPI is a low level Win32 style API that had a very meager interface and was very difficult to work for sophisticated applications. Since ISAPI is very low level it also is very fast, but fairly unmanageable for application level development. So, ISAPI has been mainly relegated for some time to providing bridge interfaces to other application or platforms. But ISAPI isn’t dead by any means. In fact, ASP.NET on Microsoft platforms interfaces with IIS through an ISAPI extension that hosts .NET and through it the ASP.NET runtime. ISAPI provides the core interface from the Web Server and ASP.NET uses the unmanaged ISAPI code to retrieve input and send output back to the client. The content that ISAPI provides is available via common objects like HttpRequest and HttpResponse that expose the unmanaged data as managed objects with a nice and accessible interface.


From Browser to ASP.NET


Let’s start at the beginning of the lifetime of a typical ASP.NET Web Request. A request starts on the browser where the user types in a URL, clicks on a hyperlink or submits an HTML form (a POST request). Or a client application might make call against an ASP.NET based Web Service, which is also serviced by ASP.NET. On the server side the Web Server – Internet Information Server 5 or 6 – picks up the request. At the lowest level ASP.NET interfaces with IIS through an ISAPI extension. With ASP.NET this request usually is routed to a page with an .aspx extension, but how the process works depends entirely on the implementation of the HTTP Handler that is set up to handle the specified extension. In IIS .aspx is mapped through an ‘Application Extension’ (aka. as a script map) that is mapped to the ASP.NET ISAPI dll - aspnet_isapi.dll. Every request that fires ASP.NET must go through an extension that is registered and points at aspnet_isapi.dll.


Depending on the extension ASP.NET routes the request to an appropriate handler that is responsible for picking up requests. For example, the .asmx extension for Web Services routes requests not to a page on disk but a specially attributed class that identifies it as a Web Service implementation. Many other handlers are installed with ASP.NET and you can also define your own. All of these HttpHandlers are mapped to point at the ASP.NET ISAPI extension in IIS, and configured in web.config to get routed to a specific HTTP Handler implementation. Each handler, is a .NET class that handles a specific extension which can range from simple Hello World behavior with a couple of lines of code, to very complex handlers like the ASP.NET Page or Web Service implementations. For now, just understand that an extension is the basic mapping mechanism that ASP.NET uses to receive a request from ISAPI and then route it to a specific handler that processes the request.


ISAPI is the first and highest performance entry point into IIS for custom Web Request handling.


The ISAPI Connection


ISAPI is a low level unmanged Win32 API. The interfaces defined by the ISAPI spec are very simplistic and optimized for performance. They are very low level – dealing with raw pointers and function pointer tables for callbacks - but they provide he lowest and most performance oriented interface that developers and tool vendors can use to hook into IIS. Because ISAPI is very low level it’s not well suited for building application level code, and ISAPI tends to be used primarily as a bridge interface to provide Application Server type functionality to higher level tools. For example, ASP and ASP.NET both are layered on top of ISAPI as is Cold Fusion, most Perl, PHP and JSP implementations running on IIS as well as many third party solutions such as my own Web Connection framework for Visual FoxPro. ISAPI is an excellent tool to provide the high performance plumbing interface to higher level applications, which can then abstract the information that ISAPI provides. In ASP and ASP.NET, the engines abstract the information provided by the ISAPI interface in the form of objects like Request and Response that read their content out of the ISAPI request information. Think of ISAPI as the plumbing. For ASP.NET the ISAPI dll is very lean and acts merely as a routing mechanism to pipe the inbound request into the ASP.NET runtime. All the heavy lifting and processing, and even the request thread management happens inside of the ASP.NET engine and your code.


As a protocol ISAPI supports both ISAPI extensions and ISAPI Filters. Extensions are a request handling interface and provide the logic to handle input and output with the Web Server – it’s essentially a transaction interface. ASP and ASP.NET are implemented as ISAPI extensions. ISAPI filters are hook interfaces that allow the ability to look at EVERY request that comes into IIS and to modify the content or change the behavior of functionalities like Authentication. Incidentally ASP.NET maps ISAPI-like functionality via two concepts: Http Handlers (extensions) and Http Modules (filters). We’ll look at these later in more detail.


ISAPI is the initial code point that marks the beginning of an ASP.NET request. ASP.NET maps various extensions to its ISAPI extension which lives in the .NET Framework directory:


<.NET FrameworkDir>\aspnet_isapi.dll


You can interactively see these mapping in the IIS Service manager as shown in Figure 1. Look at the root of the Web Site and the Home Directory tab, then Configuration | Mappings.


1


Figure 1: IIS maps various extensions like .ASPX to the ASP.NET ISAPI extension. Through this mechanism requests are routed into ASP.NET's processing pipeline at the Web Server level.


You shouldn’t set these extensions manually as .NET requires a number of them. Instead use the aspnet_regiis.exe utility to make sure that all the various scriptmaps get registered properly:


cd <.NetFrameworkDirectory>


aspnet_regiis - i


This will register the particular version of the ASP.NET runtime for the entire Web site by registering the scriptmaps and setting up the client side scripting libraries used by the various controls for uplevel browsers. Note that it registers the particular version of the CLR that is installed in the above directory. Options on aspnet_regiis let you configure virtual directories individually. Each version of the .NET framework has its own version of aspnet_regiis and you need to run the appropriate one to register a site or virtual directory for a specific version of the .NET framework. Starting with ASP.NET 2.0, an IIS ASP.NET configuration page lets you pick the .NET version interactively in the IIS management console.


IIS 5 and 6 work differently


When a request comes in, IIS checks for the script map and routes the request to the aspnet_isapi.dll. The operation of the DLL and how it gets to the ASP.NET runtime varies significantly between IIS 5 and 6. Figure 2 shows a rough overview of the flow.


In IIS 5 hosts aspnet_isapi.dll directly in the inetinfo.exe process or one of its isolated worker processes if you have isolation set to medium or high for the Web or virtual directory. When the first ASP.NET request comes in the DLL will spawn a new process in another EXE – aspnet_wp.exe – and route processing to this spawned process. This process in turn loads and hosts the .NET runtime. Every request that comes into the ISAPI DLL then routes to this worker process via Named Pipe calls.


2


Figure 2 – Request flow from IIS to the ASP.NET Runtime and through the request processing pipeline from a high level. IIS 5 and IIS 6 interface with ASP.NET in different ways but the overall process once it reaches the ASP.NET Pipeline is the same.


IIS6, unlike previous servers, is fully optimized for ASP.NET


IIS 6 – Viva the Application Pool


IIS 6 changes the processing model significantly in that IIS no longer hosts any foreign executable code like ISAPI extensions directly. Instead IIS 6 always creates a separate worker process – an Application Pool – and all processing occurs inside of this process, including execution of the ISAPI dll. Application Pools are a big improvement for IIS 6, as they allow very granular control over what executes in a given process. Application Pools can be configured for every virtual directory or the entire Web site, so you can isolate every Web application easily into its own process that will be completely isolated from any other Web application running on the same machine. If one process dies it will not affect any others at least from the Web processing perspective.


In addition, Application Pools are highly configurable. You can configure their execution security environment by setting an execution impersonation level for the pool which allows you to customize the rights given to a Web application in that same granular fashion. One big improvement for ASP.NET is that the Application Pool replaces most of the ProcessModel entry in machine.config. This entry was difficult to manage in IIS 5, because the settings were global and could not be overridden in an application specific web.config file. When running IIS 6, the ProcessModel setting is mostly ignored and settings are instead read from the Application Pool. I say mostly – some settings, like the size of the ThreadPool and IO threads still are configured through this key since they have no equivalent in the Application Pool settings of the server.


Because Application Pools are external executables these executables can also be easily monitored and managed. IIS 6 provides a number of health checking, restarting and timeout options that can detect and in many cases correct problems with an application. Finally IIS 6’s Application Pools don’t rely on COM+ as IIS 5 isolation processes did which has improved performance and stability especially for applications that need to use COM objects internally.


Although IIS 6 application pools are separate EXEs, they are highly optimized for HTTP operations by directly communicating with a kernel mode HTTP.SYS driver. Incoming requests are directly routed to the appropriate application pool. InetInfo acts merely as an Administration and configuration service – most interaction actually occurs directly between HTTP.SYS and the Application Pools, all of which translates into a more stable and higher performance environment over IIS 5. This is especially true for static content and ASP.NET applications.


An IIS 6 application pool also has intrinsic knowledge of ASP.NET and ASP.NET can communicate with new low level APIs that allow direct access to the HTTP Cache APIs which can offload caching from the ASP.NET level directly into the Web Server’s cache.


In IIS 6, ISAPI extensions run in the Application Pool worker process. The .NET Runtime also runs in this same process, so communication between the ISAPI extension and the .NET runtime happens in-process which is inherently more efficient than the named pipe interface that IIS 5 must use. Although the IIS hosting models are very different the actual interfaces into managed code are very similar – only the process in getting the request routed varies a bit.


The ISAPIRuntime.ProcessRequest() method is the first entry point into ASP.NET


Getting into the .NET runtime


The actual entry points into the .NET Runtime occur through a number of undocumented classes and interfaces. Little is known about these interfaces outside of Microsoft, and Microsoft folks are not eager to talk about the details, as they deem this an implementation detail that has little effect on developers building applications with ASP.NET.


The worker processes ASPNET_WP.EXE (IIS5) and W3WP.EXE (IIS6) host the .NET runtime and the ISAPI DLL calls into small set of unmanged interfaces via low level COM that eventually forward calls to an instance subclass of the ISAPIRuntime class. The first entry point to the runtime is the undocumented ISAPIRuntime class which exposes the IISAPIRuntime interface via COM to a caller. These COM interfaces low level IUnknown based interfaces that are meant for internal calls from the ISAPI extension into ASP.NET. Figure 3 shows the interface and call signatures for the IISAPIRuntime interface as shown in Lutz Roeder’s excellent .NET Reflector tool (http://www.aisto.com/roeder/dotnet/). Reflector an assembly viewer and disassembler that makes it very easy to look at medadata and disassembled code (in IL, C#, VB) as shown in Figure 3. It’s a great way to explore the bootstrapping process.


3


Figure 3 – If you want to dig into the low level interfaces open up Reflector, and point at the System.Web.Hosting namespace. The entry point to ASP.NET occurs through a managed COM Interface called from the ISAPI dll, that receives an unmanaged pointer to the ISAPI ECB. The ECB contains has access to the full ISAPI interface to allow retrieving request data and sending back to IIS.


The IISAPIRuntime interface acts as the interface point between the unmanaged code coming from the ISAPI extension (directly in IIS 6 and indirectly via the Named Pipe handler in IIS 5). If you take a look at this class you’ll find a ProcessRequest method with a signature like this:


[return: MarshalAs(UnmanagedType.I4)]


int ProcessRequest([In] IntPtr ecb,


[In, MarshalAs(UnmanagedType.I4)] int useProcessModel);


The ecb parameter is the ISAPI Extension Control Block (ECB) which is passed as an unmanaged resource to ProcessRequest. The method then takes the ECB and uses it as the base input and output interface used with the Request and Response objects. An ISAPI ECB contains all low level request information including server variables, an input stream for form variables as well as an output stream that is used to write data back to the client. The single ecb reference basically provides access to all of the functionality an ISAPI request has access to and ProcessRequest is the entry and exit point where this resource initially makes contact with managed code.


The ISAPI extension runs requests asynchronously. In this mode the ISAPI extension immediately returns on the calling worker process or IIS thread, but keeps the ECB for the current request alive. The ECB then includes a mechanism for letting ISAPI know when the request is complete (via ecb.ServerSupportFunction) which then releases the ECB. This asynchronous processing releases the ISAPI worker thread immediately, and offloads processing to a separate thread that is managed by ASP.NET.


ASP.NET receives this ecb reference and uses it internally to retrieve information about the current request such as server variables, POST data as well as returning output back to the server. The ecb stays alive until the request finishes or times out in IIS and ASP.NET continues to communicate with it until the request is done. Output is written into the ISAPI output stream (ecb.WriteClient()) and when the request is done, the ISAPI extension is notified of request completion to let it know that the ECB can be freed. This implementation is very efficient as the .NET classes essentially act as a fairly thin wrapper around the high performance, unmanaged ISAPI ECB.


Loading .NET – somewhat of a mystery


Let’s back up one step here: I skipped over how the .NET runtime gets loaded. Here’s where things get a bit fuzzy. I haven’t found any documentation on this process and since we’re talking about native code there’s no easy way to disassemble the ISAPI DLL and figure it out.


My best guess is that the worker process bootstraps the .NET runtime from within the ISAPI extension on the first hit against an ASP.NET mapped extension. Once the runtime exists, the unmanaged code can request an instance of an ISAPIRuntime object for a given virtual path if one doesn’t exist yet. Each virtual directory gets its own AppDomain and within that AppDomain the ISAPIRuntime exists from which the bootstrapping process for an individual application starts. Instantiation appears to occur over COM as the interface methods are exposed as COM callable methods.


To create the ISAPIRuntime instance the System.Web.Hosting.AppDomainFactory.Create() method is called when the first request for a specific virtual directory is requested. This starts the ‘Application’ bootstrapping process. The call receives parameters for type and module name and virtual path information for the application which is used by ASP.NET to create an AppDomain and launch the ASP.NET application for the given virtual directory. This HttpRuntime derived object is created in a new AppDomain. Each virtual directory or ASP.NET application is hosted in a separate AppDomain and they get loaded only as requests hit the particular ASP.NET Application. The ISAPI extension manages these instances of the HttpRuntime objects, and routes inbound requests to the right one based on the virtual path of the request.


4


Figure 4 – The transfer of the ISAPI request into the HTTP Pipeline of ASP.NET uses a number of undocumented classes and interfaces and requires several factory method calls. Each Web Application/Virtual runs in its own AppDomain with the caller holding a reference to an IISAPIRuntime interface that triggers the ASP.NET request processing.


Back in the runtime


At this point we have an instance of ISAPIRuntime active and callable from the ISAPI extension. Once the runtime is up and running the ISAPI code calls into the ISAPIRuntime.ProcessRequest() method which is the real entry point into the ASP.NET Pipeline. The flow from there is shown in Figure 4.


Remember ISAPI is multi-threaded so requests will come in on multiple threads through the reference that was returned by ApplicationDomainFactory.Create(). Listing 1 shows the disassembled code from the IsapiRuntime.ProcessRequest method that receives an ISAPI ecb object and server type as parameters. The method is thread safe, so multiple ISAPI threads can safely call this single returned object instance simultaneously.


Listing 1: The Process request method receives an ISAPI Ecb and passes it on to the Worker request


public int ProcessRequest(IntPtr ecb, int iWRType)


{


HttpWorkerRequest request1 = ISAPIWorkerRequest.CreateWorkerRequest(ecb, iWRType);


string text1 = request1.GetAppPathTranslated();


string text2 = HttpRuntime.AppDomainAppPathInternal;


if (((text2 == null) || text1.Equals(".")) ||


(string.Compare(text1, text2, true, CultureInfo.InvariantCulture) == 0))


{


HttpRuntime.ProcessRequest(request1);


return 0;


}


HttpRuntime.ShutdownAppDomain("Physical application path changed from " +


text2 + " to " + text1);


return 1;


}


The actual code here is not important, and keep in mind that this is disassembled internal framework code that you’ll never deal with directly and that might change in the future. It’s meant to demonstrate what’s happening behind the scenes. ProcessRequest receives the unmanaged ECB reference and passes it on to the ISAPIWorkerRequest object which is in charge of creating the Request Context for the current request as shown in Listing 2.


The System.Web.Hosting.ISAPIWorkerRequest class is an abstract subclass of HttpWorkerRequest, whose job it is to create an abstracted view of the input and output that serves as the input for the Web application. Notice another factory method here: CreateWorkerRequest, which as a second parameter receives the type of worker request object to create. There are three different versions: ISAPIWorkerRequestInProc, ISAPIWorkerRequestInProcForIIS6, ISAPIWorkerRequestOutOfProc. This object is created on each incoming hit and serves as the basis for the Request and Response objects which will receive their data and streams from the data provided by the WorkerRequest.


The abstract HttpWorkerRequest class is meant to provide a highlevel abstraction around the low level interfaces so that regardless of where the data comes from, whether it’s a CGI Web Server, the Web Browser Control or some custom mechanism you use to feed the data to the HTTP Runtime. The key is that ASP.NET can retrieve the information consistently.


In the case of IIS the abstraction is centered around an ISAPI ECB block. In our request processing, ISAPIWorkerRequest hangs on to the ISAPI ECB and retrieves data from it as needed. Listing 2 shows how the query string value is retrieved for example.


Listing 2: An ISAPIWorkerRequest method that uses the unmanged


// *** Implemented in ISAPIWorkerRequest


public override byte[] GetQueryStringRawBytes()


{


byte[] buffer1 = new byte[this._queryStringLength];


if (this._queryStringLength > 0)


{


int num1 = this.GetQueryStringRawBytesCore(buffer1, this._queryStringLength);


if (num1 != 1)


{


throw new HttpException( "Cannot_get_query_string_bytes");


}


}


return buffer1;


}


// *** Implemented in a specific implementation class ISAPIWorkerRequestInProcIIS6


internal override int GetQueryStringCore(int encode, StringBuilder buffer, int size)


{


if (this._ecb == IntPtr.Zero)


{


return 0;


}


return UnsafeNativeMethods.EcbGetQueryString(this._ecb, encode, buffer, size);


}


ISAPIWorkerRequest implements a high level wrapper method, that calls into lower level Core methods, which are responsible for performing the actual access to the unmanaged APIs – or the ‘service level implementation’. The Core methods are implemented in the specific ISAPIWorkerRequest instance subclasses and thus provide the specific implementation for the environment that it’s hosted in. This makes for an easily pluggable environment where additional implementation classes can be provided later as newer Web Server interfaces or other platforms are targeted by ASP.NET. There’s also a helper class System.Web.UnsafeNativeMethods. Many of these methods operate on the ISAPI ECB structure performing unmanaged calls into the ISAPI extension.


HttpRuntime, HttpContext, and HttpApplication – Oh my


When a request hits, it is routed to the ISAPIRuntime.ProcessRequest() method. This method in turn calls HttpRuntime.ProcessRequest that does several important things (look at System.Web.HttpRuntime.ProcessRequestInternal with Reflector):


  • Create a new HttpContext instance for the request

  • Retrieves an HttpApplication Instance

  • Calls HttpApplication.Init() to set up Pipeline Events

  • Init() fires HttpApplication.ResumeProcessing() which starts the ASP.NET pipeline processing


First a new HttpContext object is created and it is passed the ISAPIWorkerRequest that wrappers the ISAPI ECB. The Context is available throughout the lifetime of the request and ALWAYS accessible via the static HttpContext.Current property. As the name implies, the HttpContext object represents the context of the currently active request as it contains references to all of the vital objects you typically access during the request lifetime: Request, Response, Application, Server, Cache. At any time during request processing HttpContext.Current gives you access to all of these object.


The HttpContext object also contains a very useful Items collection that you can use to store data that is request specific. The context object gets created at the begging of the request cycle and released when the request finishes, so data stored there in the Items collection is specific only to the current request. A good example use is a request logging mechanism where you want to track start and end times of a request by hooking the Application_BeginRequest and Application_EndRequest methods in Global.asax as shown in Listing 3. HttpContext is your friend – you’ll use it liberally if you need data in different parts of the request or page processing.


Listing 3 – Using the HttpContext.Items collection lets you save data between pipeline events


protected void Application_BeginRequest(Object sender, EventArgs e)


{


//*** Request Logging


if (App.Configuration.LogWebRequests)


Context.Items.Add("WebLog_StartTime",DateTime.Now);


}


protected void Application_EndRequest(Object sender, EventArgs e)


{


// *** Request Logging


if (App.Configuration.LogWebRequests)


{


try


{


TimeSpan Span = DateTime.Now.Subtract(


(DateTime) Context.Items["WebLog_StartTime"] );


int MiliSecs = Span.TotalMilliseconds;


// do your logging


WebRequestLog.Log(App.Configuration.ConnectionString,


true,MilliSecs);


}


}


Once the Context has been set up, ASP.NET needs to route your incoming request to the appropriate application/virtual directory by way of an HttpApplication object. Every ASP.NET application must be set up as a Virtual (or Web Root) directory and each of these ‘applications’ are handled independently.


The HttpApplication is like a master of ceremonies – it is where the processing action starts


Master of your domain: HttpApplication


Each request is routed to an HttpApplication object. The HttpApplicationFactory class creates a pool of HttpApplication objects for your ASP.NET application depending on the load on the application and hands out references for each incoming request. The size of the pool is limited to the setting of the MaxWorkerThreads setting in machine.config’s ProcessModel Key, which by default is 20.


The pool starts out with a smaller number though; usually one and it then grows as multiple simulataneous requests need to be processed. The Pool is monitored so under load it may grow to its max number of instances, which is later scaled back to a smaller number as the load drops.


HttpApplication is the outer container for your specific Web application and it maps to the class that is defined in Global.asax. It’s the first entry point into the HTTP Runtime that you actually see on a regular basis in your applications. If you look in Global.asax (or the code behind class) you’ll find that this class derives directly from HttpApplication:


public class Global : System.Web.HttpApplication


HttpApplication’s primary purpose is to act as the event controller of the Http Pipeline and so its interface consists primarily of events. The event hooks are extensive and include:


  • BeginRequest

  • AuthenticateRequest

  • AuthorizeRequest

  • ResolveRequestCache

  • AquireRequestState

  • PreRequestHandlerExecute

  • …Handler Execution…

  • PostRequestHandlerExecute

  • ReleaseRequestState

  • UpdateRequestCache

  • EndRequest


Each of these events are also implemented in the Global.asax file via empty methods that start with an Application_ prefix. For example, Application_BeginRequest(), Application_AuthorizeRequest(). These handlers are provided for convenience since they are frequently used in applications and make it so that you don’t have to explicitly create the event handler delegates.


It’s important to understand that each ASP.NET virtual application runs in its own AppDomain and that there inside of the AppDomain multiple HttpApplication instances running simultaneously, fed out of a pool that ASP.NET manages. This is so that multiple requests can process at the same time without interfering with each other.


To see the relationship between the AppDomain, Threads and the HttpApplication check out the code in Listing 4.


Listing 4 – Showing the relation between AppDomain, Threads and HttpApplication instances


private void Page_Load(object sender, System.EventArgs e)


{


// Put user code to initialize the page here


this.ApplicationId = ((HowAspNetWorks.Global)


HttpContext.Current.ApplicationInstance).ApplicationId ;


this.ThreadId = AppDomain.GetCurrentThreadId();


this.DomainId = AppDomain.CurrentDomain.FriendlyName;


this.ThreadInfo = "ThreadPool Thread: " +


System.Threading.Thread.CurrentThread.IsThreadPoolThread.ToString() +


"

Thread Apartment: " +


System.Threading.Thread.CurrentThread.ApartmentState.ToString();


// *** Simulate a slow request so we can see multiple


// requests side by side.


System.Threading.Thread.Sleep(3000);


}


This is part of a demo is provided with your samples and the running form is shown in Figure 5. To check this out run two instances of a browser and hit this sample page and watch the various Ids.


5


Figure 5 – You can easily check out how AppDomains, Application Pool instances, and Request Threads interact with each other by running a couple of browser instances simultaneously. When multiple requests fire you’ll see the thread and Application ids change, but the AppDomain staying the same.


You’ll notice that the AppDomain ID stays steady while thread and HttpApplication Ids change on most requests, although they likely will repeat. HttpApplications are running out of a collection and are reused for subsequent requests so the ids repeat at times. Note though that Application instance are not tied to a specific thread – rather they are assigned to the active executing thread of the current request.


Threads are served from the .NET ThreadPool and by default are Multithreaded Apartment (MTA) style threads. You can override this apartment state in ASP.NET pages with the ASPCOMPAT="true" attribute in the @Page directive. ASPCOMPAT is meant to provide COM components a safe environment to run in and ASPCOMPAT uses special Single Threaded Apartment (STA) threads to service those requests. STA threads are set aside and pooled separately as they require special handling.


The fact that these HttpApplication objects are all running in the same AppDomain is very important. This is how ASP.NET can guarantee that changes to web.config or individual ASP.NET pages get recognized throughout the AppDomain. Making a change to a value in web.config causes the AppDomain to be shut down and restarted. This makes sure that all instances of HttpApplication see the changes made because when the AppDomain reloads the changes from ASP.NET are re-read at startup. Any static references are also reloaded when the AppDomain so if the application reads values from App Configuration settings these values also get refreshed.


To see this in the sample, hit the ApplicationPoolsAndThreads.aspx page and note the AppDomain Id. Then go in and make a change in web.config (add a space and save). Then reload the page. You’ll l find that a new AppDomain has been created.


In essence the Web Application/Virtual completely ‘restarts’ when this happens. Any requests that are already in the pipeline processing will continue running through the existing pipeline, while any new requests coming in are routed to the new AppDomain. In order to deal with ‘hung requests’ ASP.NET forcefully shuts down the AppDomain after the request timeout period is up even if requests are still pending. So it’s actually possible that two AppDomains exist for the same HttpApplication at a given point in time as the old one’s shutting down and the new one is ramping up. Both AppDomains continue to serve their clients until the old one has run out its pending requests and shuts down leaving just the new AppDomain running.


Flowing through the ASP.NET Pipeline


The HttpApplication is responsible for the request flow by firing events that signal your application that things are happening. This occurs as part of the HttpApplication.Init() method (look at System.Web.HttpApplication.InitInternal and HttpApplication.ResumeSteps() with Reflector) which sets up and starts a series of events in succession including the call to execute any handlers. The event handlers map to the events that are automatically set up in global.asax, and they also map any attached HTTPModules, which are essentially an externalized event sink for the events that HttpApplication publishes.


Both HttpModules and HttpHandlersare loaded dynamically via entries in Web.config and attached to the event chain. HttpModules are actual event handlers that hook specific HttpApplication events, while HttpHandlers are an end point that gets called to handle ‘application level request processing’.


Both Modules and Handlers are loaded and attached to the call chain as part of the HttpApplication.Init() method call. Figure 6 shows the various events and when they happen and which parts of the pipeline they affect.


56


Figure 6 – Events flowing through the ASP.NET HTTP Pipeline. The HttpApplication object’s events drive requests through the pipeline. Http Modules can intercept these events and override or enhance existing functionality.


HttpContext, HttpModules and HttpHandlers


The HttpApplication itself knows nothing about the data being sent to the application – it is a merely messaging object that communicates via events. It fires events and passes information via the HttpContext object to the called methods. The actual state data for the current request is maintained in the HttpContext object mentioned earlier. It provides all the request specific data and follows each request from beginning to end through the pipeline. Figure 7 shows the flow through ASP.NET pipeline. Notice the Context object which is your compadre from beginning to end of the request and can be used to store information in one event method and retrieve it in a later event method.


Once the pipeline is started, HttpApplication starts firing events one by one as shown in Figure 6. Each of the event handlers is fired and if events are hooked up those handlers execute and perform their tasks. The main purpose of this process is to eventually call the HttpHandler hooked up to a specific request. Handlers are the core processing mechanism for ASP.NET requests and usually the place where any application level code is executed. Remember that the ASP.NET Page and Web Service frameworks are implemented as HTTPHandlers and that’s where all the core processing of the request is handled. Modules tend to be of a more core nature used to prepare or post process the Context that is delivered to the handler. Typical default handlers in ASP.NET are Authentication, Caching for pre-processing and various encoding mechanisms on post processing.


There’s plenty of information available on HttpHandlers and HttpModules so to keep this article a reasonable length I’m going to provide only a brief overview of handlers.


HttpModules


As requests move through the pipeline a number of events fire on the HttpApplication object. We’ve already seen that these events are published as event methods in Global.asax. This approach is application specific though which is not always what you want. If you want to build generic HttpApplication event hooks that can be plugged into any Web applications you can use HttpModules which are reusable and don’t require application specific code except for an entry in web.config.


Modules are in essence filters – similar in functionality to ISAPI filters at the ASP.NET request level. Modules allow hooking events for EVERY request that pass through the ASP.NET HttpApplication object. These modules are stored as classes in external assemblies that are configured in web.config and loaded when the Application starts. By implementing specific interfaces and methods the module then gets hooked up to the HttpApplication event chain. Multiple HttpModules can hook the same event and event ordering is determined by the order they are declared in Web.config. Here’s what a handler definition looks like in Web.config:


<configuration>


<system.web>


<httpModules>


<add name= "BasicAuthModule"


type="HttpHandlers.BasicAuth,WebStore" />


httpModules>


system.web>


configuration>


Note that you need to specify a full typename and an assembly name without the DLL extension.


Modules allow you look at each incoming Web request and perform an action based on the events that fire. Modules are great to modify request or response content, to provide custom authentication or otherwise provide pre or post processing to every request that occurs against ASP.NET in a particular application. Many of ASP.NET’s features like the Authentication and Session engines are implemented as HTTP Modules.


While HttpModules feel similar to ISAPI Filters in that they look at every request in that comes through an ASP.NET Application, they are limited to looking at requests mapped to a single specific ASP.NET application or virtual directory and then only against requests that are mapped to ASP.NET. Thus you can look at all ASPX pages or any of the other custom extensions that are mapped to this application. You cannot however look at standard .HTM or image files unless you explicitly map the extension to the ASP.NET ISAPI dll by adding an extension as shown in Figure 1. A common use for a module might be to filter content to JPG images in a special folder and display a ‘SAMPLE’ overlay ontop of every image by drawing ontop of the returned bitmap with GDI+.


Implementing an HTTP Module is very easy: You must implement the IHttpModule interface which contains only two methods Init() and Dispose(). The event parameters passed include a reference to the HTTPApplication object, which in turn gives you access to the HttpContext object. In these methods you hook up to HttpApplication events. For example, if you want to hook the AuthenticateRequest event with a module you would do what’s shown in Listing 5.


Listing 5: The basics of an HTTP Module are very simple to implement


public class BasicAuthCustomModule : IHttpModule


{


public void Init(HttpApplication application)


{


// *** Hook up any HttpApplication events


application.AuthenticateRequest +=


new EventHandler(this.OnAuthenticateRequest);


}


public void Dispose() { }


public void OnAuthenticateRequest(object source, EventArgs eventArgs)


{


HttpApplication app = (HttpApplication) source;


HttpContext Context = HttpContext.Current;


do what you have to do… }


}


Remember that your Module has access the HttpContext object and from there to all the other intrinsic ASP.NET pipeline objects like Response and Request, so you can retrieve input etc. But keep in mind that certain things may not be available until later in the chain.


You can hook multiple events in the Init() method so your module can manage multiple functionally different operations in one module. However, it’s probably cleaner to separate differing logic out into separate classes to make sure the module is modular. In many cases functionality that you implement may require that you hook multiple events – for example a logging filter might log the start time of a request in Begin Request and then write the request completion into the log in EndRequest.


Watch out for one important gotcha with HttpModules and HttpApplication events: Response.End() or HttpApplication.CompleteRequest() will shortcut the HttpApplication and Module event chain. See the sidebar “Watch out for Response.End() “ for more info.


HttpHandlers


Modules are fairly low level and fire against every inbound request to the ASP.NET application. Http Handlers are more focused and operate on a specific request mapping, usually a page extension that is mapped to the handler.


Http Handler implementations are very basic in their requirements, but through access of the HttpContext object a lot of power is available. Http Handlers are implemented through a very simple IHttpHandler interface (or its asynchronous cousin, IHttpAsyncHandler) which consists of merely a single method – ProcessRequest() – and a single property IsReusable. The key is ProcessRequest() which gets passed an instance of the HttpContext object. This single method is responsible for handling a Web request start to finish.


Single, simple method? Must be too simple, right? Well, simple interface, but not simplistic in what’s possible! Remember that WebForms and WebServices are both implemented as Http Handlers, so there’s a lot of power wrapped up in this seemingly simplistic interface. The key is the fact that by the time an Http Handler is reached all of ASP.NET’s internal objects are set up and configured to start processing of requests. The key is the HttpContext object, which provides all of the relevant request functionality to retireve input and send output back to the Web Server.


For an HTTP Handler all action occurs through this single call to ProcessRequest(). This can be as simple as:


public void ProcessRequest(HttpContext context)


{


context.Response.Write("Hello World");


}


to a full implementation like the WebForms Page engine that can render complex forms from HTML templates. The point is that it’s up to you to decide of what you want to do with this simple, but powerful interface!


Because the Context object is available to you, you get access to the Request, Response, Session and Cache objects, so you have all the key features of an ASP.NET request at your disposal to figure out what users submitted and return content you generate back to the client. Remember the Context object – it’s your friend throughout the lifetime of an ASP.NET request!


The key operation of the handler should be eventually write output into the Respone object or more specifically the Response object’s OutputStream. This output is what actually gets sent back to the client. Behind the scenes the ISAPIWorkerRequest manages sending the OutputStream back into the ISAPI ecb.WriteClient method that actually performs the IIS output generation.


6


Figure 7 – The ASP.NET Request pipeline flows requests through a set of event interfaces that provide much flexibility. The Application acts as the hosting container that loads up the Web application and fires events as requests come in and pass through the pipeline. Each request follows a common path through the Http Filters and Modules configured. Filters can examine each request going through the pipeline and Handlers allow implementation of application logic or application level interfaces like Web Forms and Web Services. To provide Input and Output for the application the Context object provides request specific information throughout the entire process.


WebForms implements an Http Handler with a much more high level interface on top of this very basic framework, but eventually a WebForm’s Render() method simply ends up using an HtmlTextWriter object to write its final final output to the context.Response.OutputStream. So while very fancy, ultimately even a high level tool like Web forms is just a high level abstraction ontop of the Request and Response object.


You might wonder at this point whether you need to deal with Http Handlers at all. After all WebForms provides an easily accessible Http Handler implementation, so why bother with something a lot more low level and give up that flexibility?


WebForms are great for generating complex HTML pages and business level logic that requires graphical layout tools and template backed pages. But the WebForms engine performs a lot of tasks that are overhead intensive. If all you want to do is read a file from the system and return it back through code it’s much more efficient to bypass the Web Forms Page framework and directly feed the file back. If you do things like Image Serving from a Database there’s no need to go into the Page framework – you don’t need templates and there surely is no Web UI that requires you to capture events off an Image served.


There’s no reason to set up a page object and session and hook up Page level events – all of that stuff requires execution of code that has nothing to do with your task at hand.


So handlers are more efficient. Handlers also can do things that aren’t possible with WebForms such as the ability to process requests without the need to have a physical file on disk, which is known as a virtual Url. To do this make sure you turn off ‘Check that file exists’ checkbox in the Application Extension dialog shown in Figure 1.


This is common for content providers, such as dynamic image processing, XML servers, URL Redirectors providing vanity Urls, download managers and the like, none of which would benefit from the WebForm engine.


Have I stooped low enough for you?


Phew – we’ve come full circle here for the processing cycle of requests. That’s a lot of low level information and I haven’t even gone into great detail about how HTTP Modules and HTTP Handlers work. It took some time to dig up this information and I hope this gives you some of the same satisfaction it gave me in understanding how ASP.NET works under the covers.


Before I’m done let’s do the quick review of the event sequences I’ve discussed in this article from IIS to handler:


  • IIS gets the request

  • Looks up a script map extension and maps to aspnet_isapi.dll

  • Code hits the worker process (aspnet_wp.exe in IIS5 or w3wp.exe in IIS6)

  • .NET runtime is loaded

  • IsapiRuntime.ProcessRequest() called by non-managed code

  • IsapiWorkerRequest created once per request

  • HttpRuntime.ProcessRequest() called with Worker Request

  • HttpContext Object created by passing Worker Request as input

  • HttpApplication.GetApplicationInstance() called with Context to retrieve instance from pool

  • HttpApplication.Init() called to start pipeline event sequence and hook up modules and handlers

  • HttpApplicaton.ProcessRequest called to start processing

  • Pipeline events fire

  • Handlers are called and ProcessRequest method are fired

  • Control returns to pipeline and post request events fire


It’s a lot easier to remember how all of the pieces fit together with this simple list handy. I look at it from time to time to remember. So now, get back to work and do something non-abstract…


Although what I discuss here is based on ASP.NET 1.1, it looks that the underlying processes described here haven’t changed in ASP.NET 2.0.